Saturday, June 11, 2011
Monday, January 31, 2011
Droomvogel Finished
 I created a smoking egg-effect as a extra accesoire for the droomvogel. The smoke is two supersecret non-toxic chemicals (well non toxic when they are forming smoke).
I especially like the fact that the smoke appears to be blue, because the inside of the egg is blue.
If you want to see more of the things I build for magic-tricks I will be posting them at: http://www.snoep.at/
This is me signing of on the dragon project.
Closing the dragon project
While I was working on my dragon (and a game about magic) I met a group of magicians, who help children in need. Magic Care.. It's a charming concept similar to the well known clini-clowns, only I think with a longer lasting effect.
The children get presents (and the necessary instructons) which allow them to become a performer rather than a patient. This is a great role reversal in a situation where children are trapped and have few options.
Anyway...
So, I spent a lot of time lately creating magic-tricks. I personally designed one (a simple one) and am now working together with these magicians to create another (and actually several others are planned). I think this is much more fun, because it yields something you can actually use and it's a new way of thinking about material and effects.
As a bonus we made a levitating puppet using the same techniques I used for the head of the dragon, and some special techniques (which I can't tell you about, because I didn't create them and they are secret).
 This project is called the dreambird (droomvogel).. It's no longer a secret, so I can post it here now.
I now feel my dragon-project is rather frivolous. I will not be able to do anything with the dragon once it's finished except maybe show it of a few times. I'm not a performer or a magician and I have little ambition to become one, except maybe in the context above.
I am closing the dragon project and aim to create a few magic tricks in the near future..
Maybe I'll come back to the dragon some day, who knows..
The children get presents (and the necessary instructons) which allow them to become a performer rather than a patient. This is a great role reversal in a situation where children are trapped and have few options.
Anyway...
So, I spent a lot of time lately creating magic-tricks. I personally designed one (a simple one) and am now working together with these magicians to create another (and actually several others are planned). I think this is much more fun, because it yields something you can actually use and it's a new way of thinking about material and effects.
As a bonus we made a levitating puppet using the same techniques I used for the head of the dragon, and some special techniques (which I can't tell you about, because I didn't create them and they are secret).

I now feel my dragon-project is rather frivolous. I will not be able to do anything with the dragon once it's finished except maybe show it of a few times. I'm not a performer or a magician and I have little ambition to become one, except maybe in the context above.
I am closing the dragon project and aim to create a few magic tricks in the near future..
Maybe I'll come back to the dragon some day, who knows..
Thursday, August 26, 2010
Wednesday, August 25, 2010
Dracorex Hogwartsia
I couldn't resist, I reworked my model in photoshop to fit the skull of the dracorex hogwartsia.
As a finishing touch I added hogwarts as a background. (The neck is a bit to wide for the actual skeleton, but hey, this is more dragonlike)
As a finishing touch I added hogwarts as a background. (The neck is a bit to wide for the actual skeleton, but hey, this is more dragonlike)
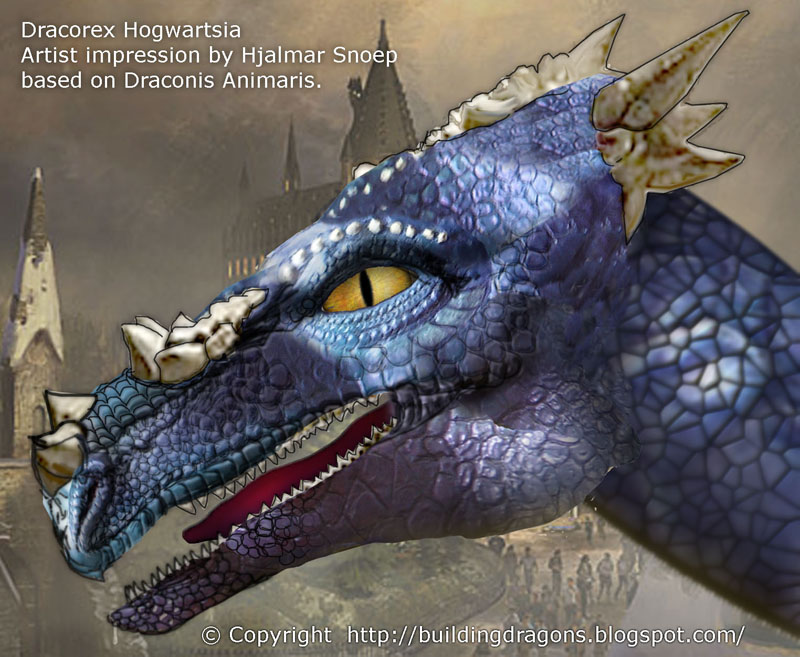 |
| Now I know for a fact, that the Dracorex Hogwartsia was blue, but I might be a bit biased :) |
Primeval dracorex
I saw a dracorex hogwartsia on primeval yesterday. I know a bit about dinosaurs and discarded it as fiction.
Today I searched in google because I rather liked the head they created.
It seems dracorex hogwartsia is for real. It has only recently been discovered by 3 amateurs. (2005). A dinosaur that looks like an actual dragon, but was an early stage of pachycephalosaurus (the thick skulled dinosaurs that used to ram their skulls together, probably in some mating ritual).
Because of the way it looks, they named it after Harry Potters school for Magic.
Here is the wiki link:
 http://en.wikipedia.org/wiki/Dracorex
It nicely solves my teething problem, by not having any teeth in the beak area. Also it was a herbivore, so that explains the small teeth. My dragon should have slightly larger teeth, but I see now that a dragons main weapons are not it's teeth.. Inspired by this I might add a few horns.
Today I searched in google because I rather liked the head they created.
It seems dracorex hogwartsia is for real. It has only recently been discovered by 3 amateurs. (2005). A dinosaur that looks like an actual dragon, but was an early stage of pachycephalosaurus (the thick skulled dinosaurs that used to ram their skulls together, probably in some mating ritual).
Because of the way it looks, they named it after Harry Potters school for Magic.
Here is the wiki link:

It nicely solves my teething problem, by not having any teeth in the beak area. Also it was a herbivore, so that explains the small teeth. My dragon should have slightly larger teeth, but I see now that a dragons main weapons are not it's teeth.. Inspired by this I might add a few horns.
Aaargh, my laptop has crashed

Wednesday, August 11, 2010
The body frame finished in concept
I went to the hardware store and got some measurements. Then I 'build' the frame considering the size of actual planks and boards I can buy. The I build the desired shape of the body in organica and simplified the model. In this animation you see how it will (hopefully) all fit together. My plan is now, to bind pvc pipes (at the right lengths) together with tape, skin them with chickenwire and put a thin layer of paper-mache and ultra-light clay on top of that for scales.
As you can see I had to change some stuff around to fit everything in the desired shape. The cage-gear thingy that I copie from Leonardo da Vinci is no longer a cage, but more like an angled gear (I do hope this will be strong enough). However, this will be a lot easier to make and will cause a lot less friction (and weight) than the gears I had in the first attempt at making the frame/body..
The weight is distributed a little unevenly, but Yoris should also have a sound-device, and my smoke machine, so that will probably even things out a little.
Saturday, August 7, 2010
Da vinci (and discovery channel) solved my gear problem.
I was watching Da Vinci's Machines for the first time and saw the Armored car (with canons, so I guess it's really a tank). The tank is driven by a very engenious stretched gear system, which is perfect for my dragon.

The principle is to build a cage, which will be rotated by the pegs in the big wheel. Another cage on the other side will drive another wheel. This way the rotation of the wheels is synchronised with a minimum of gears.
Da Vinci used this to transfer the movement from the middle to both sides simultaneously, but this principle will work in threefold for my dragon.
Thursday, June 24, 2010
Some dragons build themselves

During the long and tiresome process of creating the others legs, I found a perfect place to assemble the dragon, when it's ready.
It's a really secluded part of the forest, where I now have built a primitive hut, to store my tools.
Unfortunately there is somewhat of a gnat and mosquito problem, because of which my left hand now looks a bit like a balloon or as my wife says: the hand of mickey mouse.
I seem to overreact to the horseflies, that also live in my forest.
At the same time, my father found this natural dragon on his travels in the united states.
Sunday, April 25, 2010
We're bahack!
After a sick spell I have decided to start again with the dragon making.
Today is the day of the fantasyfair for us, this will probably be a big inspiration. I will post some pictures later.
For a couple of weeks now I have been working on my own costume and I'm quite satisfied.
Now I have a complete year to finish Yoris which is probably better planning anyway :)

Today is the day of the fantasyfair for us, this will probably be a big inspiration. I will post some pictures later.
For a couple of weeks now I have been working on my own costume and I'm quite satisfied.
Now I have a complete year to finish Yoris which is probably better planning anyway :)

Monday, February 1, 2010
markings on the skin and dirt.

I was happy with what I have now, but it can always get even better.
Normally animals aren't unicolor. Dirt builds up and off course there is markings for display or camouflage.
Around the eyes and lips of a lizard pink will shine through. Nostrils tend to be darker then the rest and the base of a bone will be darker then the rest. (Maybe this is just dirt, but it looks real)
So I did a mix of all those things in photoshop, to see what I need. Also I put the bonues and teeth in place and took away the background.
I decided to keep the markings quite simple. I put black around the scaly area but created a kind of lip in this way. The nostrils got a helping and the base of the little bones as well.

This created a kind of natural marking for the dragon and made it look a bit meaner again (less girly)
So I'm definitely going to put some more black on it! We'll have to see about the pink.
Here are some examples of dinosaurs that were reconstructed, that I looked at. I'll tell you what I liked about them:
1. Dark around the bones.
2. Different types of scales in one head, also the use of two colors close to each other for a kind of bony bit.
3. Very natural color graduation and bone structures.
4 camouflaging. Now I decided against actual camouflage, because I think a dragon would be absolute top of the food chain. It would only use colors to attract mates and for display.
5. Here I like the difference in the shape of the scales at the mout and around the eye. I used this example when detailing the skin.
Monday, January 25, 2010
detailing the dragonskin

I tried detailing the skin of the head I made earlier with paint, because I wanted to get a clearer picture of the end-result and finally decide if I would use texturing in PepaCura or not.
So I looked at iguana's and then painted some colorfull scales on a piece of paper and finally on my dragonhead. I liked the result in the shadow and because it's wintertime and not much direct sunlight is available, I was convinced for a while, that this was the way to go.
 I was using a kind of trompe l'oeil effect on the scales, which worked fine in the shade, but when it came into direct sunlight it just looked flat.
So I tried something, which you can see around the nose area. I made a layer of clay and drew the scales in and then spraypainted the area in two shades of blue and silver. After this I used a black CD-marker to fill in the bits between the scales in black.
After the marker was applied I used a mother-of-pearl glossing spray, which turned the black a bit purple. The effect was MUCH cooler in direct sunlight.
Here is a close up of my real-life scales:

These were drawn as a experiment with the back of a brush. At this point I was using my expensive synthetic filler for smooth surfaces as a kind of clay, so I decided to get some cheap clay and try it again with that.
I should have expected that clay is much easier to handle, but I was still surprised at how well it stuck to the surface and how little I needed.
The head did get about twice as heavy when I did one half, but the result is very cool.
After seeing what I did whith the scales my daughter (8) decided that the dragon is now a girl.
I understand what she means, I tried to get some beauty into the monster.
If you put it all together this is what I have now:

Sunday, January 3, 2010
theory and practice
Here is the stop motion animation with the actual prototype, compared with the theory in virtual space.. I got nicer curves without gravity and material stress, but I like the result anyway.
The one thing I love about a touchable model is that I finally could get the foot to work right.
Yoris now lifts his foot while he lifts his leg. This is due to a little length of rope I tied to a point on his thy, around his knee and ankle, to his toes..
Prototype for leg
 My first try using these metal thingies called "draadeind" in Dutch. (all thread or threaded nod)
I'm learning a lot about tools and stuff. A draadeind is basically a bolt without an ending. It's perfect for screwing things together if you don't know how long your bolts should be.
After this phase I started measuring and bought the right bolts. Also I learned that when you turn nuts into eachother they will form a blockade that cannot be broken without tools.. (a handy alternative to a deposit bolt (borgmoer), that you can dissassemble time and again)
I made a fool of myself asking for yellow PVC pipes in the sewerage department and was after much discussion sent to the electrics department. Apparently everybody but me knows that yellow pvc pipes are used for electrics only.
I feel like a real macho man now that I know all these things. I actually own a hammer, two types of saws and a pair of plyers by now and use them regularly. I never got past screwdrivers, because with computers you don't need much more.
I am officially leaving whimphood and carefully venturing into obsessional nerddom..
This picture should give you some idea of the scale..
Saturday, December 26, 2009
Shopping list
 1 leg
1 leg-about 15 m of PVC PIPE.
ROUNDWOOD fitting in pvc pipe (40 cm)
-rope.
-glue (wood-plastic)
(10 pivots)
-40 screws
-40 cm round wood.
-40 Screw in-hooks
-10 Long bolt fitting the hooks, 50 nuts to close
I'll start with one leg and a frame, if that works, I'll make the other 5
To make the frame:
2 boards of +/- 205x50
Some beams spanning 40 cm (x8?) more screws..

The gears and axes:
Something that can to this and is about 50 cm long
Rather thick (5/10 cm) wooden plates to make the gears, I'll have to work out the respective sizes.
wintery intermezzo

We had a lot of snow (by Dutch standards) this past two weeks. I had shoveled all the snow in the backyard into one big heap and it kind of looked like a drag on.
on.
 on.
on.So when I had the time, I took one of the kitchen knives and started carving.
I was very happy with the result. (Painted it's Eye light blue). Now after two days of thawing it has been reduced to a shapeless lump. Alas my dragons are not built to last.
It did give me a clear idea of how big Yoris will be, as Yoris would be about twice the size of this rather large dragon. My son Tim (5) without any knowledge of English gave the best possible description of this dragon: "Cool!"
Saturday, December 12, 2009
construction draft.

This would be the construction, but I'll have to think of something for the neck gear..
Else the beams connecting to it, will have to go through the axis..
Lengths of the legs and positions on the frame..
This might be a bit technical, and boring, but I need these values to be preserved and this is the easiest way. With these lengths the animaris draconis will be two meters high at it's highest point in the cycle:

frame dimensions: 204.16 cm x 48.92 cm
 | HindLeg (poot1) axis-m0: 5.25 cm m0-m4: 37.23 cm m0-m1: 11.4 cm m2-m4: 24.14 cm m2-m1: 18.57 cm m2-m6: 13.3 cm m1-m6: 28.33 cm m4-m7: 16.27 cm m6-m7: 28.58 cm m4-m9: 29.08 cm m7-m9: 35.53 cm m7-m9: 35.53 cm m9-m8: 11.41 cm m10-m8: 27.27 cm m9-m11: 20.28 cm m11-m12: 16.51 cm string: m10-m12: 58.8 cm m10 is at 70% of m0-m4 |
 | middle leg: (poot3) axis-m0: 5.49 cm m0-m4: 47.85 cm m0-m1: 11.76 cm m2-m4: 34.76 cm m2-m1: 20.19 cm m2-m6: 14.32 cm m1-m6: 30.67 cm m4-m7: 10.39 cm m6-m7: 36.74 cm m4-m9: 34.39 cm m7-m9: 38.23 cm m7-m9: 38.23 cm m9-m8: 4.69 cm m8-m10: 17.74 cm string: m3-m10: 53.2 cm m3 is at 70% of m2-m4 |
 | front Leg: (poot5) axis-m0: 5.66 cm m0-m4: 49.25 cm m0-m1: 12.13 cm m2-m4: 35.79 cm m2-m1: 20.76 cm m2-m6: 14.7 cm m1-m6: 31.51 cm m4-m7: 10.7 cm m6-m7: 37.82 cm m4-m9: 35.39 cm m7-m9: 39.36 cm m7-m9: 39.36 cm m9-m8: 3.38 cm m8-m10: 22.33 cm string: m3-m10: 59.3 cm m3 is at 70% of m2-m4 |
 | NECK: (poot7) axis-m0: 3.52 cm m0-m1: 10.12 cm m2-m1: 11.6 cm m4-m5: 94.55 cm m1-m5: 94.87 cm m2-m6: 100.04 cm m5-m6: 11 cm |

frame dimensions: 204.16 cm x 48.92 cm
| point A: 89.79,29.09 | point E: 160.26,24.55 | point I: 26.11,41.07 | point M: 6.8,8.69 |
| point B: 175.58,43.12 | point F: 108.08,39.5 | point J: 5.95,35.41 | |
| point C: 192.79,35.44 | point G: 127.97,35.26 | point K: 52.38,19.07 | |
| point D: 159.75,10.05 | point H: 23.04,9.5 | point L: 32.4,3.15 |
Thinking further on the gears
I revisited the mechanism and started calculating..
Also I left out four smaller gears for two larger ones, this will decrease the amount of drag from the gears.
Since three red gears have to move as one and there positioning is crucial, I had to calculate the sizes and positions of the connecting gears exactly. Also I found it esthetically pleasing to have the neck-bob at about half the standard gear speed.
The ratios had to be determined, so that the number of 'teeth' on each gear would be an integer, else the gears cannot connect.
After two hours or so I came up with 4 standard gears of 40 teeth all having the same speed (the red ones and the yellow one).
A gear (purple) scaled 240% giving 96 teeth, with a speed of 41.667% of the standard for the neck.
A gear (cyan) scaled 325% giving 130 teeth (and a speed of about 30%), connecting the standard gear with the neck gear.
A gear (fuchsia) scaled 275% with 110 teeth (and a speed of 36.4%) connecting the two aft standard gears.

This is math at it's finest. You can actually create something in advance, and know it will work perfectly. Just to be sure, I simulated the gears in flash and found something out.
I'll have to revise my scetch of the body shape (background, grey) a little bit, because some of the gears were sticking out.

Also I left out four smaller gears for two larger ones, this will decrease the amount of drag from the gears.
Since three red gears have to move as one and there positioning is crucial, I had to calculate the sizes and positions of the connecting gears exactly. Also I found it esthetically pleasing to have the neck-bob at about half the standard gear speed.
The ratios had to be determined, so that the number of 'teeth' on each gear would be an integer, else the gears cannot connect.
After two hours or so I came up with 4 standard gears of 40 teeth all having the same speed (the red ones and the yellow one).
A gear (purple) scaled 240% giving 96 teeth, with a speed of 41.667% of the standard for the neck.
A gear (cyan) scaled 325% giving 130 teeth (and a speed of about 30%), connecting the standard gear with the neck gear.
A gear (fuchsia) scaled 275% with 110 teeth (and a speed of 36.4%) connecting the two aft standard gears.

I'll have to revise my scetch of the body shape (background, grey) a little bit, because some of the gears were sticking out.

in this detail of the standard gear stuck between the two oversized ones, you can see how needly everything fitted and why I felt like da Vinci for working it out in advance.. (Or maybe Hannibal from the A-team, saying: "I love it when a plan comes together!")
Subscribe to:
Posts (Atom)
